Sign In with Facebook
Sign In with Facebook
Introduction
In the previous guide, we learned how a user signs into a Back4App application using a Google account. As a follow-up, we may now add a sign-in alternative that uses a Facebook account instead. To accomplish this, we first go to Facebook’s developer page and set up the requirements to integrate such functionality in an Xcode project. Facebook provides an SDK to developers to integrate a sign in with Facebook option among different apps.
In this repository, we provide a simple Xcode template where you can test the different sign-in methods we are implementing. This example was already introduced in the log-in guide, you can revisit it for more details about the project.
Prerequisites
To complete this quickstart, you need:
- A recent version of Xcode.
- An app created at Back4App.
- Note: Follow the Install Parse SDK (Swift) Tutorial to create an Xcode Project connected to Back4App.
Goal
To integrate a user sign-in feature using Facebook’s SDK and ParseSwift.
1 - Setting up Facebook’s SDK
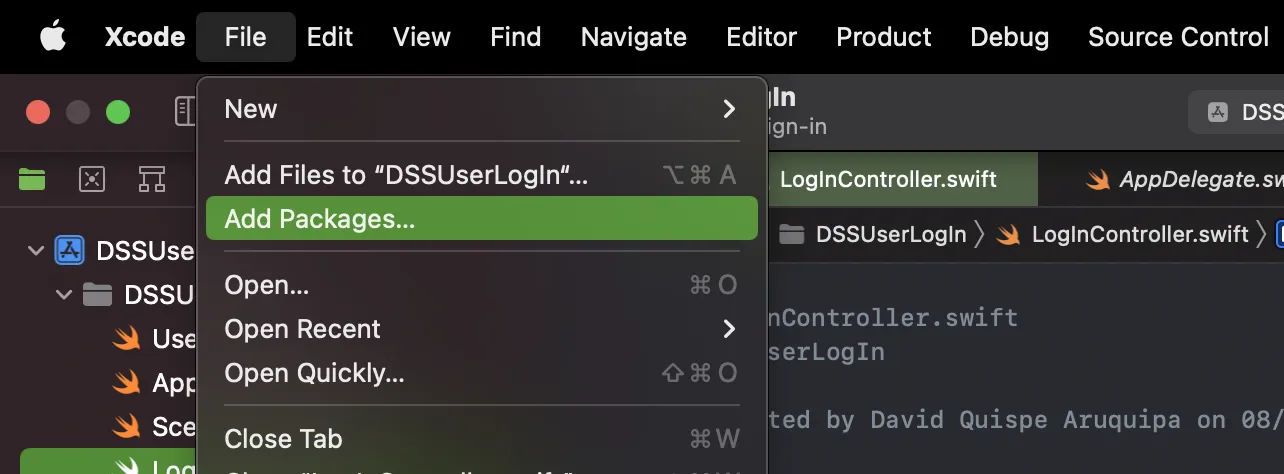
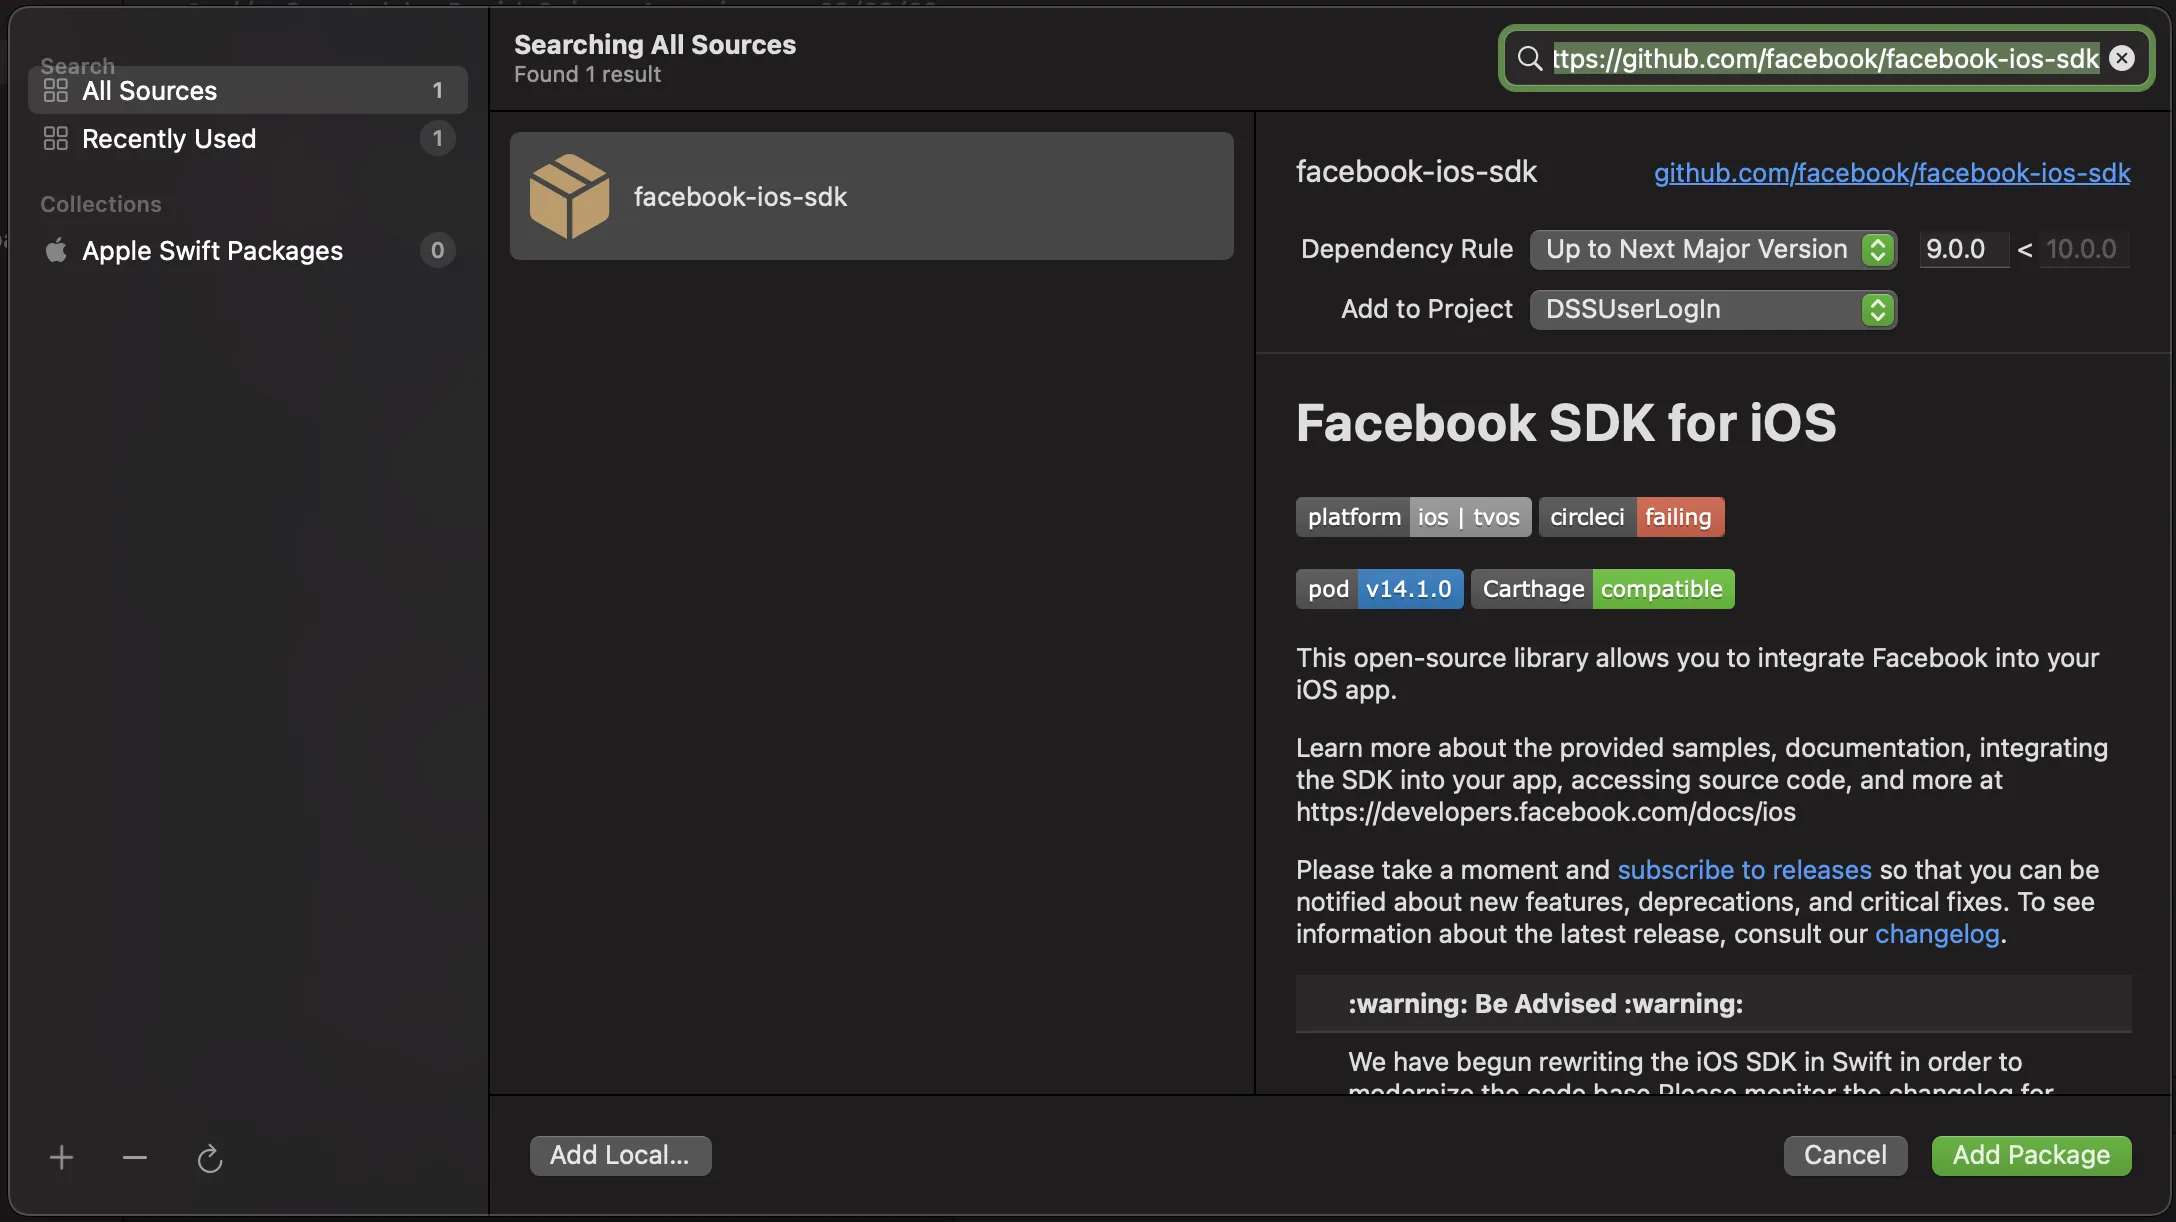
- Once we have the Xcode project linked to the Back4App application, we proceed to add Facebook’s SDK which will allow us to implement the sign-in flow. For this example, we use the Swift Package Manager (SPM) to add Facebook Login dependencies. In the Xcode project, go to File>Add packages… and in the search bar, look for https://github.com/facebook/facebook-ios-sdk.
Once the facebook-ios-sdk appears in the results, click on the Add Package button.
- Next, go to the apps section of your Facebook developer account and create a new app. Enter the type of app your app belongs to and go to the next page. Enter the remaining information and click on Create app. While you are on your apps page, locate your newly created app, copy its App ID and enter the dashboard by clicking on its name. In the top right, it is located the Client ID associated with your Facebook developer account. These two IDs are necessary for the following configuration.
- The next configuration Facebook needs to set up the sign-in capability is to enter a couple of key-value data in your Xcode Info.plist file. More precisely, go to your Xcode project navigator, locate the Info.plist and open it as source code. Add the following values:
1   <key>CFBundleURLTypes</key>
2   <array>
3	        <dict>
4		            <key>CFBundleTypeRole</key>
5		            <string>Editor</string>
6		            <key>CFBundleURLSchemes</key>
7	             	<array>
8   			            <string>fbAPP_ID</string>
9   		        </array>
10  	    </dict>
11  </array>
12  <key>FacebookAppID</key>
13  <string>APP_ID</string>
14  <key>FacebookClientToken</key>
15  <string>CLIENT_TOKEN</string>
16  <key>LSApplicationQueriesSchemes</key>
17  <array>
18  	<string>fbapi</string>
19  	<string>fb-messenger-share-api</string>
20  </array>
Replace the APP_ID string with the App ID associated with the newly created app on Facebook. The CLIENT_TOKEN string has to be replaced with the client token located in Dashboard>Settings>Advanced>Security>Client token.
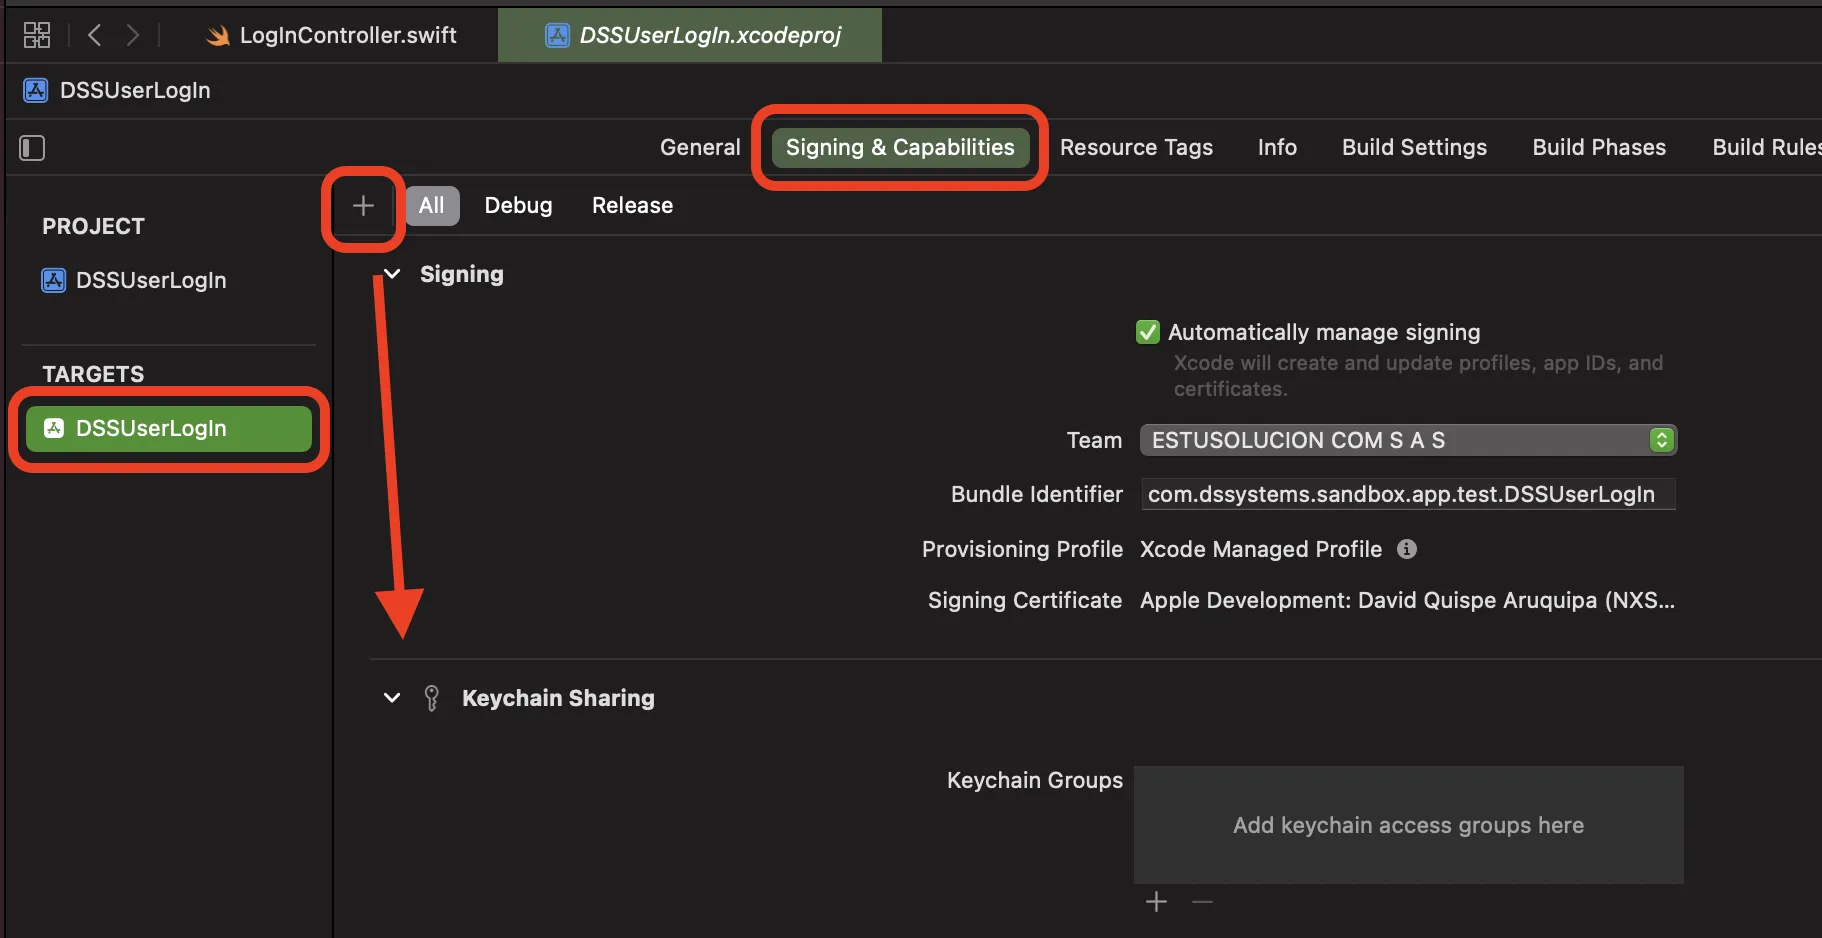
- Now we have to add the Keychain Sharing capability to the Xcode project. To do this, select your project from the project navigator and go to the targets section. Select a target and go to the Signing & Capabilities tab, then click on the + Capability button and add the Keychain Sharing capability:
- In the AppDelegate, we add the following line in the application(_:didFinishLaunchingWithOptions:) delegate method (Make sure you import the FacebookCore framework first)
1   import FacebookCore
2
3   @main
4   class AppDelegate: UIResponder, UIApplicationDelegate {
5     func application(_ application: UIApplication, didFinishLaunchingWithOptions launchOptions: [UIApplication.LaunchOptionsKey: Any]?) -> Bool {
6       ...
7
8       ApplicationDelegate.shared.application(application, didFinishLaunchingWithOptions: launchOptions)
9       return true
10    }
11
12    ...
13 }- Lastly, in the SceneDelegate, we add the following code to handle incoming URL contexts
1   import FacebookCore
2
3   class SceneDelegate: UIResponder, UIWindowSceneDelegate {
4     ...
5
6     func scene(_ scene: UIScene, openURLContexts URLContexts: Set<UIOpenURLContext>) {
7       guard let url = URLContexts.first?.url else {
8         return
9       }
10
11      ApplicationDelegate.shared.application(
12        UIApplication.shared,
13        open: url,
14        sourceApplication: nil,
15        annotation: [UIApplication.OpenURLOptionsKey.annotation]
16      )
17    }
18  }
2 - Using Facebook Login with ParseSwift
With FacebookLogin successfully integrated into your Xcode project, we proceed to implement the sign in with Facebook feature. In the project example, the LogInController is in charge of handling and displaying the different sign-in options. We then set up the signInWithFacebookButton action:
1   // LogInController.swift file
2   import FacebookLogin
3   ...
4
5   class LogInController: UIViewController {
6     ...
7
8     private let signInWithFacebookButton: UIButton = {
9       let button = UIButton(type: .system)
10      button.setImage(UIImage(named: "facebookIcon"), for: .normal)
11      button.imageView?.contentMode = .scaleAspectFit
12      return button
13    }()
14
15    override func viewDidLoad() {
16      super.viewDidLoad()
17      // ...
18      // Layout configuration
19      // ...
20
21      signInWithFacebookButton.addTarget(self, action: #selector(handleSignInWithFacebook), for: .touchUpInside)
22    }
23  }
24
25  // MARK: - Sign in with Facebook section
26  extension LogInController {
27    @objc fileprivate func handleSignInWithFacebook() {
28      // TODO: Here we will implement the sign-in procedure
29    }
30  }
In order to show the sign-in form from Facebook, the FacebookLogin SDK allows us to set up and present it via the signIn(with:presenting:callback) method from the LoginManager class. We have to pass an array containing String values associated with the data we want to gather from Facebook. The common values are public_profile and email.
On the other hand, the second parameter is a callback closure where Facebook returns the user credential (embedded in a LoginManagerLoginResult object) or an error if the authentication fails.
1   // MARK: - Sign in with Facebook section
2   extension LogInController {
3     @objc fileprivate func handleSignInWithFacebook() {
4       let loginManager = LoginManager()
5
6       // Method provided by the Facebook SDK. See https://developers.facebook.com/docs/facebook-login/ios/ for more details
7       loginManager.logIn(permissions: ["public_profile", "email"], from: self) { [weak self] result, error in
8         if let error = error {
9           self?.showMessage(title: "Error", message: error.localizedDescription)
10          return
11        } else if let result = result, result.isCancelled {
12          self?.showMessage(title: "Alert", message: "Sign in cancelled")
13          return
14        }
15
16        // Once facebook successfully signs in the user, we retrieve the information related to the sign-in process via the result.token object, an AccessToken class type
17        guard let accessToken = result?.token else { fatalError("This dhould never hapen.") }
18
19        // TODO: Sign in the user on your Back4App application with the accessToken.
20      }
21    }
22  }
We then take this credential and use them for the user to sign in to the Back4App platform. The object representing the user is the following struct (see the Login guide for more details):
1   import ParseSwift
2
3   struct User: ParseUser {
4     ...
5
6     var username: String?
7     var email: String?
8     var emailVerified: Bool?
9     var password: String?
10
11    var age: Int?
12  }
Therefore, the credential returned by Facebook contains an accessToken and the user’s id that will be used to complete the sign-in process. More precisely, we instantiate a ParseFacebook<User> object and call the login(userId:authenticationToken:completion:) method:
1   // MARK: - Sign in with Facebook section
2   extension LogInController {
3     @objc fileprivate func handleSignInWithFacebook() {
4       let loginManager = LoginManager()
5
6       // Method provided by the Facebook SDK. See https://developers.facebook.com/docs/facebook-login/ios/ for more details
7       loginManager.logIn(permissions: ["public_profile", "email"], from: self) { [weak self] result, error in
8         if let error = error {
9           self?.showMessage(title: "Error", message: error.localizedDescription)
10          return
11        } else if let result = result, result.isCancelled {
12          self?.showMessage(title: "Alert", message: "Sign in cancelled")
13          return
14        }
15
16        // Once facebook successfully signed in the user, we retrieve the information related to the sign in process via the result.token object, an AccessToken class type
17        guard let accessToken = result?.token else { fatalError("This dhould never hapen.") }
18
19        // With the accessToken returned by Facebook, you need to sign in the user on your Back4App application
20        User.facebook.login(userId: accessToken.userID, accessToken: accessToken.tokenString) { [weak self] result in
21          // Returns the User object asociated to the facebook user returned by Facebook
22          switch result {
23          case .success(let user):
24            // After the login succeeded, we send the user to the home screen
25            // Additionally, you can complete the user information with the data provided by Facebook
26            let homeController = HomeController()
27            homeController.user = user
28
29            self?.navigationController?.pushViewController(homeController, animated: true)
30          case .failure(let error):
31            // Handle the error if the login process failed
32            self?.showMessage(title: "Failed to sign in", message: error.message)
33          }
34        }
35      }
36    }
37  }
3 - Verifying user sign in and session creation
To make sure that the Google sign-in worked, you can look at your Back4App application dashboard and see the new User containing the Facebook authData parameters.
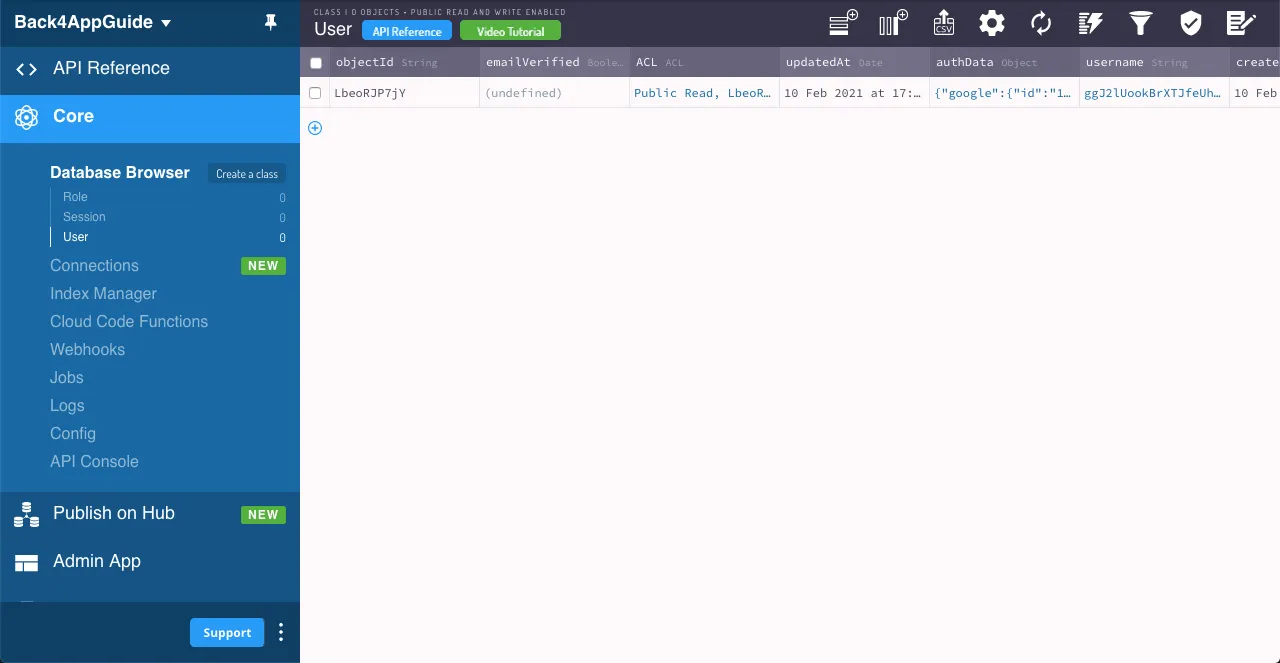
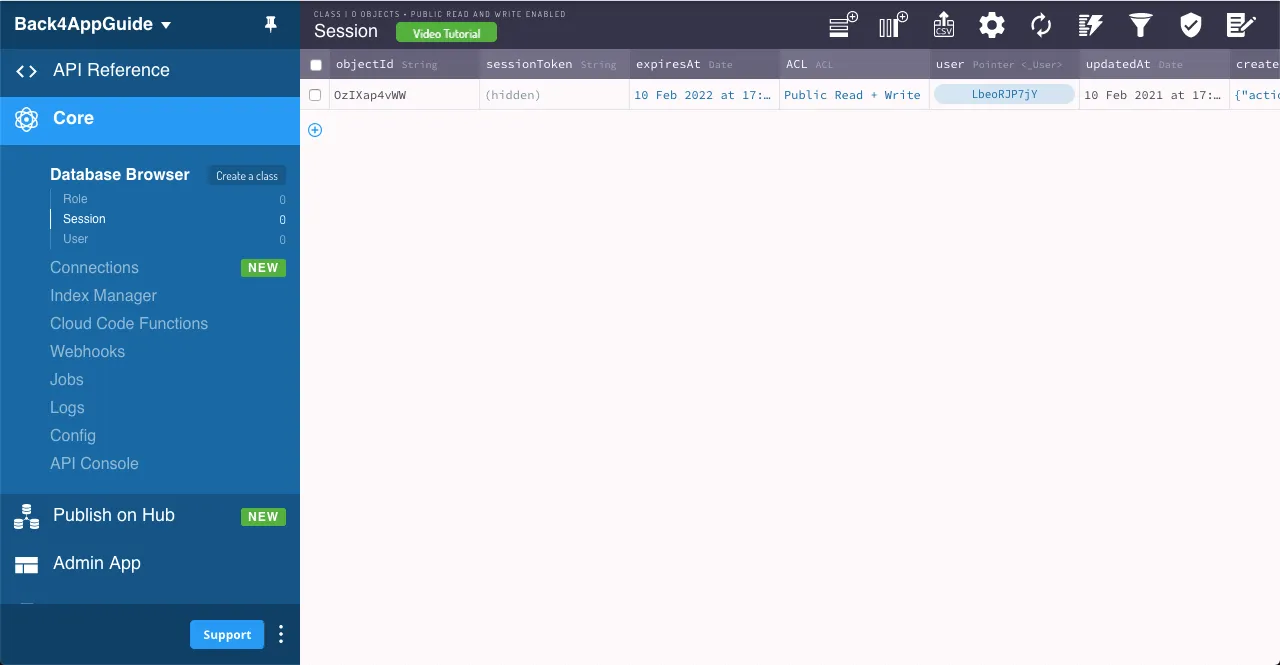
You can also verify that a valid session was created in the dashboard, containing a pointer to the corresponding User object.
4 - Linking an existing User to a Facebook account
In case your iOS App requires you to associate a Facebook account to an existing user in your Back4App platform, the ParseFacebook<User> object implements the method link(id:accessToken:completion:) where you pass the userId of the Facebook account and the accessToken associated with the session
1   let facebookUserId: String // The userID of the Facebook account to link to
2   let accessToken: String = AccessToken.current!.tokenString // The access token of the currently signed in Facebook user
3
4   User.facebook.link(userId: facebookUserId, accessToken: accessToken) { result in
5      switch result {
6     case .success(let user):
7        // Linking succeeded, the user is now linked to the corresponding Facebook account
8     case .failure(let error):
9       // Linking failed, handle the error
10    }
11  }
5 - Signing out
The sign-out process does not vary from the standard way of calling the User.signout() method (detailed in previous guides). However, when a user signs in with a Facebook account, for consistency, you have to sign out the current Facebook user as well. We can accomplish this by calling the following method alongside User.signout().
In order to verify if the current user has a linked Facebook account, you can check it by looking at the User.current?.authData dictionary.
6 - Run the app
You can go to this repository and download the example project. Before running the project, make sure you set up the provisioning profiles with the ones associated with your developer account.
Conclusion
At the end of this guide, you learned how to sign in or link existing Back4App users on iOS using sign in with Facebook. In the next guide, we will continue with a different sign-in method.