Aqui podem fazer o teste
Quickstart
Back4App is an open source (based on Parse Platform ), low code platform that helps you to develop modern apps. On Back4App, you will find the following features:
- Data Storage (Relational)
- Cloud Code Functions
- APIs (GraphQL and REST)
- File Storage
- Authentication
- Push Notifications
5-minute quick start
After creating your Back4App account and your first App, go to your App Dashboard and get your App Keys under App Settings-> Security & Keys(check the image below). Note that you will always need two keys to connect with Back4App, the Application ID, and another key according to the SDKyou will use.
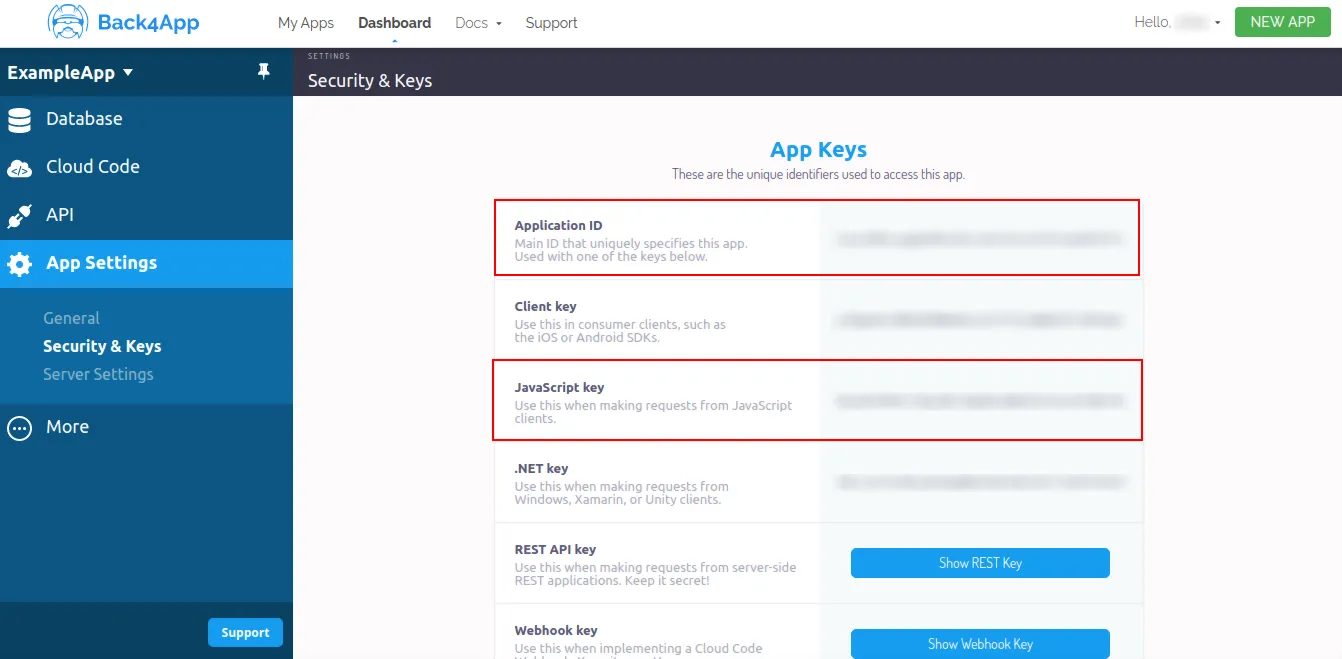
Parse JavaScript SDK can be used in a large amount of platforms and frameworks.
1. Install Parse SDK
Use CocoaPods to add the native RNAsyncStorage to your project:
2. Initialize the SDK using your Application ID and JavaScript Key
1   //On your App.js file
2    import AsyncStorage from '@react-native-async-storage/async-storage';
3    import Parse from 'parse/react-native';
4
5    //Before using the SDK...
6    Parse.setAsyncStorage(AsyncStorage);
7    //Paste below the Back4App Application ID AND the JavaScript KEY
8    Parse.initialize('YOUR_APPLICATION_ID_HERE', 'YOUR_JAVASCRIPT_KEY_HERE');
9    //Point to Back4App Parse API address
10   Parse.serverURL = 'https://parseapi.back4app.com/'
3. Save your first data on Back4App
Call the function saveNewPlayer to save your first data on Back4App. After calling the function go to your App Dashboard and check the data you’ve just saved.
1. Install the dependency of Parse JavaScript SDK
2. Install the SDK
1  //Import Parse minified version
2  import Parse from 'parse/dist/parse.min.js';
3. Save your first data on Back4App
Call the function saveNewPlayerto save your first data on Back4App. After calling the function go to your App Dashboard and check the data you’ve just saved.
1   async function saveNewPlayer() {
2     //Create your Parse Object
3     const soccerPlayer = new Parse.Object('SoccerPlayer');
4     //Define its attributes
5     soccerPlayer.set('playerName', 'A. Wed');
6     soccerPlayer.set('yearOfBirth', 1997);
7     soccerPlayer.set('emailContact', '[email protected]');
8     soccerPlayer.set('attributes', ['fast', 'good conditioning']);
9     try {
10      //Save the Object
11      const result = await soccerPlayer.save();
12      alert('New object created with objectId: ' + result.id);
13    } catch (error) {
14      alert('Failed to create new object: ' + error.message);
15    }
16 }1. Install the NPM module
2. Install the SDK
1  var Parse = require('parse/node');
2
3  Parse.initialize("APP_ID","JS_KEY"); //PASTE HERE YOUR Back4App APPLICATION ID AND YOUR JavaScript KEY
4  Parse.serverURL = 'https://parseapi.back4app.com/'
3. Save your first data on Back4App
Call the function saveNewPlayer to save your first data on Back4App. After calling the function go to your App Dashboard and check the data you’ve just saved.
1   async function saveNewPlayer() {
2     //Create your Parse Object
3     const soccerPlayer = new Parse.Object('SoccerPlayer');
4     //Define its attributes
5     soccerPlayer.set('playerName', 'A. Wed');
6     soccerPlayer.set('yearOfBirth', 1997);
7     soccerPlayer.set('emailContact', '[email protected]');
8     soccerPlayer.set('attributes', ['fast', 'good conditioning']);
9     try {
10      //Save the Object
11      const result = await soccerPlayer.save();
12      alert('New object created with objectId: ' + result.id);
13    } catch (error) {
14      alert('Failed to create new object: ' + error.message);
15    }
16 }1. Install the NPM module
2. Install the SDK
1   import * as Parse from 'parse';
2
3   @Component({ ... })
4
5   export class AppComponent {
6     ...
7
8     constructor() {
9       // Initialize your Parse App Keys
10      Parse.initialize("APP_ID","JS_KEY"); //PASTE HERE YOUR Back4App 11APPLICATION ID AND YOUR JavaScript KEY
12      Parse.serverURL = 'https://parseapi.back4app.com/'
13    }
14  }
3. Save your first data on Back4App
Call the function saveNewPlayer to save your first data on Back4App. After calling the function go to your App Dashboard and check the data you’ve just saved.
1   async function saveNewPlayer() {
2     //Create your Parse Object
3     const soccerPlayer = new Parse.Object('SoccerPlayer');
4     //Define its attributes
5     soccerPlayer.set('playerName', 'A. Wed');
6     soccerPlayer.set('yearOfBirth', 1997);
7     soccerPlayer.set('emailContact', '[email protected]');
8     soccerPlayer.set('attributes', ['fast', 'good conditioning']);
9     try {
10      //Save the Object
11      const result = await soccerPlayer.save();
12      alert('New object created with objectId: ' + result.id);
13    } catch (error) {
14      alert('Failed to create new object: ' + error.message);
15    }
16 }After creating your index.html, install Parse SDK direct on it, inside the <head> tag, using the code below.
1  <!DOCTYPE html>
2  <html>
3  <head>
4    <title>My First Application</title>
5    <script type="text/javascript" src="https://npmcdn.com/parse/dist/parse.min.js"></script>
6    <script type="text/javascript" type="text/javascript">
7      Parse.initialize("APP_ID","JS_KEY"); //PASTE HERE YOUR Back4App APPLICATION ID AND YOUR JavaScript KEY
8      Parse.serverURL = 'https://parseapi.back4app.com/'
9    </script>
10  </head>
11  <body>
12    <!--
13      Your code
14    -->
15  </body>
16  </html>
2. Save your first data on Back4App
Call the function saveNewPlayer to save your first data on Back4App. After calling the function go to your App Dashboard and check the data you’ve just saved.
1   async function saveNewPlayer() {
2     //Create your Parse Object
3     const soccerPlayer = new Parse.Object('SoccerPlayer');
4     //Define its attributes
5     soccerPlayer.set('playerName', 'A. Wed');
6     soccerPlayer.set('yearOfBirth', 1997);
7     soccerPlayer.set('emailContact', '[email protected]');
8     soccerPlayer.set('attributes', ['fast', 'good conditioning']);
9     try {
10      //Save the Object
11      const result = await soccerPlayer.save();
12      alert('New object created with objectId: ' + result.id);
13    } catch (error) {
14      alert('Failed to create new object: ' + error.message);
15    }
16  }
Install the latest Parse Flutter SDK in your application. Then, create a Flutter Project:
Create a Flutter Project
Check if everything is OK running the application:
Installing Flutter plugin for Parse Server
Add Parse to the project dependencies to pubspec.yaml file:
1. Setting up Parse SDK
In your Dart Code, clean all main.dart code and start a new one importing the Parse SDK.
1 import 'package:flutter/material.dart';
2 import 'package:parse_server_sdk_flutter/parse_server_sdk.dart';
2. Initialize the SDK using your Application ID and Client Key
1 void main() async {
2  final keyApplicationId = 'YOUR_APPLICATION_ID_HERE';
3  final keyClientKey = 'YOUR_CLIENT_KEY_HERE';
4  final keyParseServerUrl = 'https://parseapi.back4app.com';
5
6  await Parse().initialize(keyApplicationId, keyParseServerUrl,
7      clientKey: keyClientKey, debug: true);
8  }
3. Save your first data on Back4App
1  void main() async {
2    Future<String> saveNewPlayer() async {
3      final soccerPlayer = ParseObject('SoccerPlayer')
4	      ..set('playerName', 'A. Wed')
5	      ..set('yearOfBirth', 1997)
6	      ..set('emailContact', '[email protected]')
7	      ..set('attributes', ['fast', 'good conditioning'])
8	      await soccerPlayer.save();
9	      return soccerPlayer.objectId;
10   }
Facing any trouble? Feel free to check the complete Install Parse SDK guide to Flutter projects . Also, feel free to check the official Parse Documentation regarding Parse SDK for Flutter .
1. Parse Android SDK Installation
To install the latest Parse Android SDK in your application, go to the build.gradle(Module:app) file and insert the code snippet inside the dependencies{} tag
1   // ... code
2   android {...}
3
4   dependencies {
5     // code...
6     // Don't forget to change the line below with the latest version of Parse SDK for Android
7     implementation "com.github.parse-community.Parse-SDK-Android:parse:latest.version.here"
8   }
9
10  repositories {
11    mavenCentral()
12    jcenter()
13    maven { url 'https://jitpack.io' }
14  }
You can find out which is the latest version of Parse SDK for Android at Jitpack Website .
Facing any trouble? Feel free to check the complete Install Parse SDK guide to Android projects . Also, feel free to check the official Parse Documentation regarding Parse SDK for android.
2. Initialize the SDK using your Application ID and Client Key
Inside the strings.xml file, insert the following lines, with your application keys.
1   <resources>
2    <string name="back4app_server_url">https://parseapi.back4app.com/</string>
3    <!-- Change the following strings as required -->
4    <string name="back4app_app_id">APP_ID</string>
5    <string name="back4app_client_key">CLIENT_KEY</string>
6  </resources>
3. Give Permissions and set up your App
You need to grant permission for your Android app to access the internet network. Add the following code snippet to your AndroidManifest.xml file right after the application tag.
1  <uses-permission android:name="android.permission.ACCESS_NETWORK_STATE" />
2  <uses-permission android:name="android.permission.INTERNET" />
Also, inside the applicationtag, add the following:
1   <meta-data
2     android:name="com.parse.SERVER_URL"
3     android:value="@string/back4app_server_url" />
4   <meta-data
5     android:name="com.parse.APPLICATION_ID"
6     android:value="@string/back4app_app_id" />
7   <meta-data
8     android:name="com.parse.CLIENT_KEY"
9     android:value="@string/back4app_client_key" />
4. Initialize Parse SDK
Create a Java file calledApp that extends Application. Inside App.java onCreate method, right after super.onCreate() call the following code:
1  import com.parse.Parse;
2
3  Parse.initialize(new Parse.Configuration.Builder(this)
4    .applicationId(getString(R.string.back4app_app_id))
5    // if defined
6    .clientKey(getString(R.string.back4app_client_key))
7    .server(getString(R.string.back4app_server_url))
8    .build()
9  );
Don’t forget to define this file in the AndroidManifest.xml.To do so, go to the AndroidManifest.xmlfile and add the following line of code inside the application tag:
If the name of the java file that extends Application that you created on the previous step isn’t “App”, don’t forget that the code above should have the correct name of the file (android:name=".name_of_the_file").
Facing any trouble? Feel free to check the complete Install Parse SDK guide to Android projects . Also, feel free to check the official Parse Documentation regarding Parse SDK for android.
5. Save your first data on Back4App
Call the function saveNewPlayer. Then, go to your App Dashboard and check the data you’ve just saved.
1  private void saveNewPlayer() {
2    ParseObject soccerPlayer = new ParseObject("SoccerPlayer");
3    soccerPlayer.put("playerName", "A. Wed");
4    soccerPlayer.put("yearOfBirth", 1997);
5    soccerPlayer.put("emailContact", "[email protected]");
6    soccerPlayer.put("attributes", ["fast", "good conditioning"]);
7    soccerPlayer.saveInBackground();
8  }
Install CocoaPods and Import Parse
Xcode can use CocoaPods as dependency manager for Swift Cocoa projects. To install CocoaPods, copy the following code snippet and paste it into your terminal and hit return.
You can refer to CocoaPods Getting Started Guide for additional details.
Connect your Parse App
Open your project’s AppDelegate file to set up app’s credentials. Parse SDK for iOS uses these settings to connect to the Back4App servers. At the top of the file you should see a function called didFinishLaunchingWithOptions. Paste the following code snippet inside this function, and make sure it is above the line that says return true.
At the top of your AppDelegate.swift file make sure to include Parse as a module by using the following code snippet right below import UIKit.
1 import ParseFacing any trouble? Feel free to check the complete Install Parse SDK guide to iOS Swift projects. Also, feel free to check the official Parse Documentation regarding Parse SDK for iOS .
2. Initialize the SDK using your Application ID and Client Key
1  let configuration = ParseClientConfiguration {
2    $0.applicationId = "PASTE_YOUR_APPLICATION_ID_HERE"
3    $0.clientKey = "PASTE_YOUR_CLIENT_ID_HERE"
4    $0.server = "https://parseapi.back4app.com"
5  }
6  Parse.initialize(with: configuration)
3. Save your first data on Back4App
1   var soccerPlayer = PFObject(className:"SoccerPlayer")
2   person["playerName"] = "A. Wed"
3   person["yearOfBirth"] = 1997
4   person["emailContact"] = "[email protected]"
5   person["attributes"] = ["fast", "good conditioning"]
6   person.saveInBackground {
7     (success: Bool, error: Error?) in
8     if (success) {
9       // The object has been saved.
10    } else {
11      // There was a problem, check error.description
12    }
13  }
1. Parse PHP SDK Installation
1.1 With composer
Create a composer.json file in your projects root folder, containing the following.
Run the “composer install” to download and set up the autoloader. After that, you can require it from your PHP script, using the code below.
1 require 'vendor/autoload.php';1.2 With Git
Go to Parse SDK for PHP page on GitHub and clone it.
Inside your PHP file, include the autoload.php to automatically load the Parse SDK classes.
2. Initialize the SDK using your Application ID, Rest Key and Master Key.
1   ParseClient::initialize( $app_id, $rest_key, $master_key);
2   ParseClient::setServerURL('https://parseapi.back4app.com','/');
3. Save your first data on Back4App
1   $soccerPlayer = new ParseObject("SoccerPlayer");
2   $soccerPlayer->set("name", "A. Wed");
3   $soccerPlayer->set("yearOfBirth", 1997);
4   $soccerPlayer->set('emailContact', '[email protected]');
5   $soccerPlayer->setArray('attributes', ['fast', 'good conditioning']);
6
7   try {
8	        $soccerPlayer->save();
9	        echo 'New object created with objectId: ' . $soccerPlayer->getObjectId();
10  } catch (ParseException $ex) {
11	        echo 'Failed to create new object, with error message: ' . $ex->getMessage();
12  }
Facing any trouble? Feel free to check the official Parse Documentation regarding Parse SDK for PHP .
We need to add some libraries to set up Parse SDK for .NET. We will get them through Nuget Packages. To do so, go to Microsoft Visual Studio and at the Solution Explorer, click on your app’s name and go toManage NuGet Packages....
Then, click onBrowse to search and install the packages parse by Parse and Xamarin.Android.Support.v7.AppCompat by Xamarin Inc.
Save your first data on Back4App
1  ParseObject soccerPlayer = new ParseObject("SoccerPlayer");
2  soccerPlayer["name"] = "A. Wed";
3  soccerPlayer["yearOfBirth"] = 1997;
4  soccerPlayer["emailContact"] = "[email protected]";
5  soccerPlayer["attributes"] = new List<object>{"fast", "good conditioning"};
6  await soccerPlayer.SaveAsync();
Facing any trouble? Feel free to check the official Parse Documentation regarding Parse SDK for .NET .
1. Save your first data on Back4App
Open your terminal, and run the following command:
What can you build with Back4App?
There are many example apps and starter projects to get going
ReactJS Slack Clone - A React template using real-time, relational queries and authentication.
Flutter User Login/SignUp - A user sign-up/login flutter template using Parse.User class.
React Native Associations - A template on React Native digging deeper into associations and relational queries using Pointers andRelations.
Flutter File Storage - Saving files from a Flutter app.
GeoPointers on Kotlin-Android - Exploring GeoPointers in Android.
ToDo List example is Swift-iOS - A ToDo List example in Swift.
What to do Next?
After a quick start, we recommend keeping exploring the Back4App main features by checking out the guides below. You will find how to store and query relational data, use cloud functions to add business logic to your backend, use real-time subscriptions to keep your users up-to-date, store files, send push notifications, use the authentication mechanisms available on Back4App, and more. Choose the technology that suits you and enjoy the journey.